- // 01The Unique Genetics of Zerg Production
- // 02The Great Dilemma: Drones vs. Combat Units
- // 03The Passive Mindset: Scaling for the Late Game
- // 04The Aggressive Mentality: Sacrifice for the Push
- // 05The "Build Check": Measuring Economic Health
- // 06Tactical Defence: Knowing When to Build Sunkens
- // 07Early-Game Unit Comparison
- // 08Mastering the Swarm Rhythm
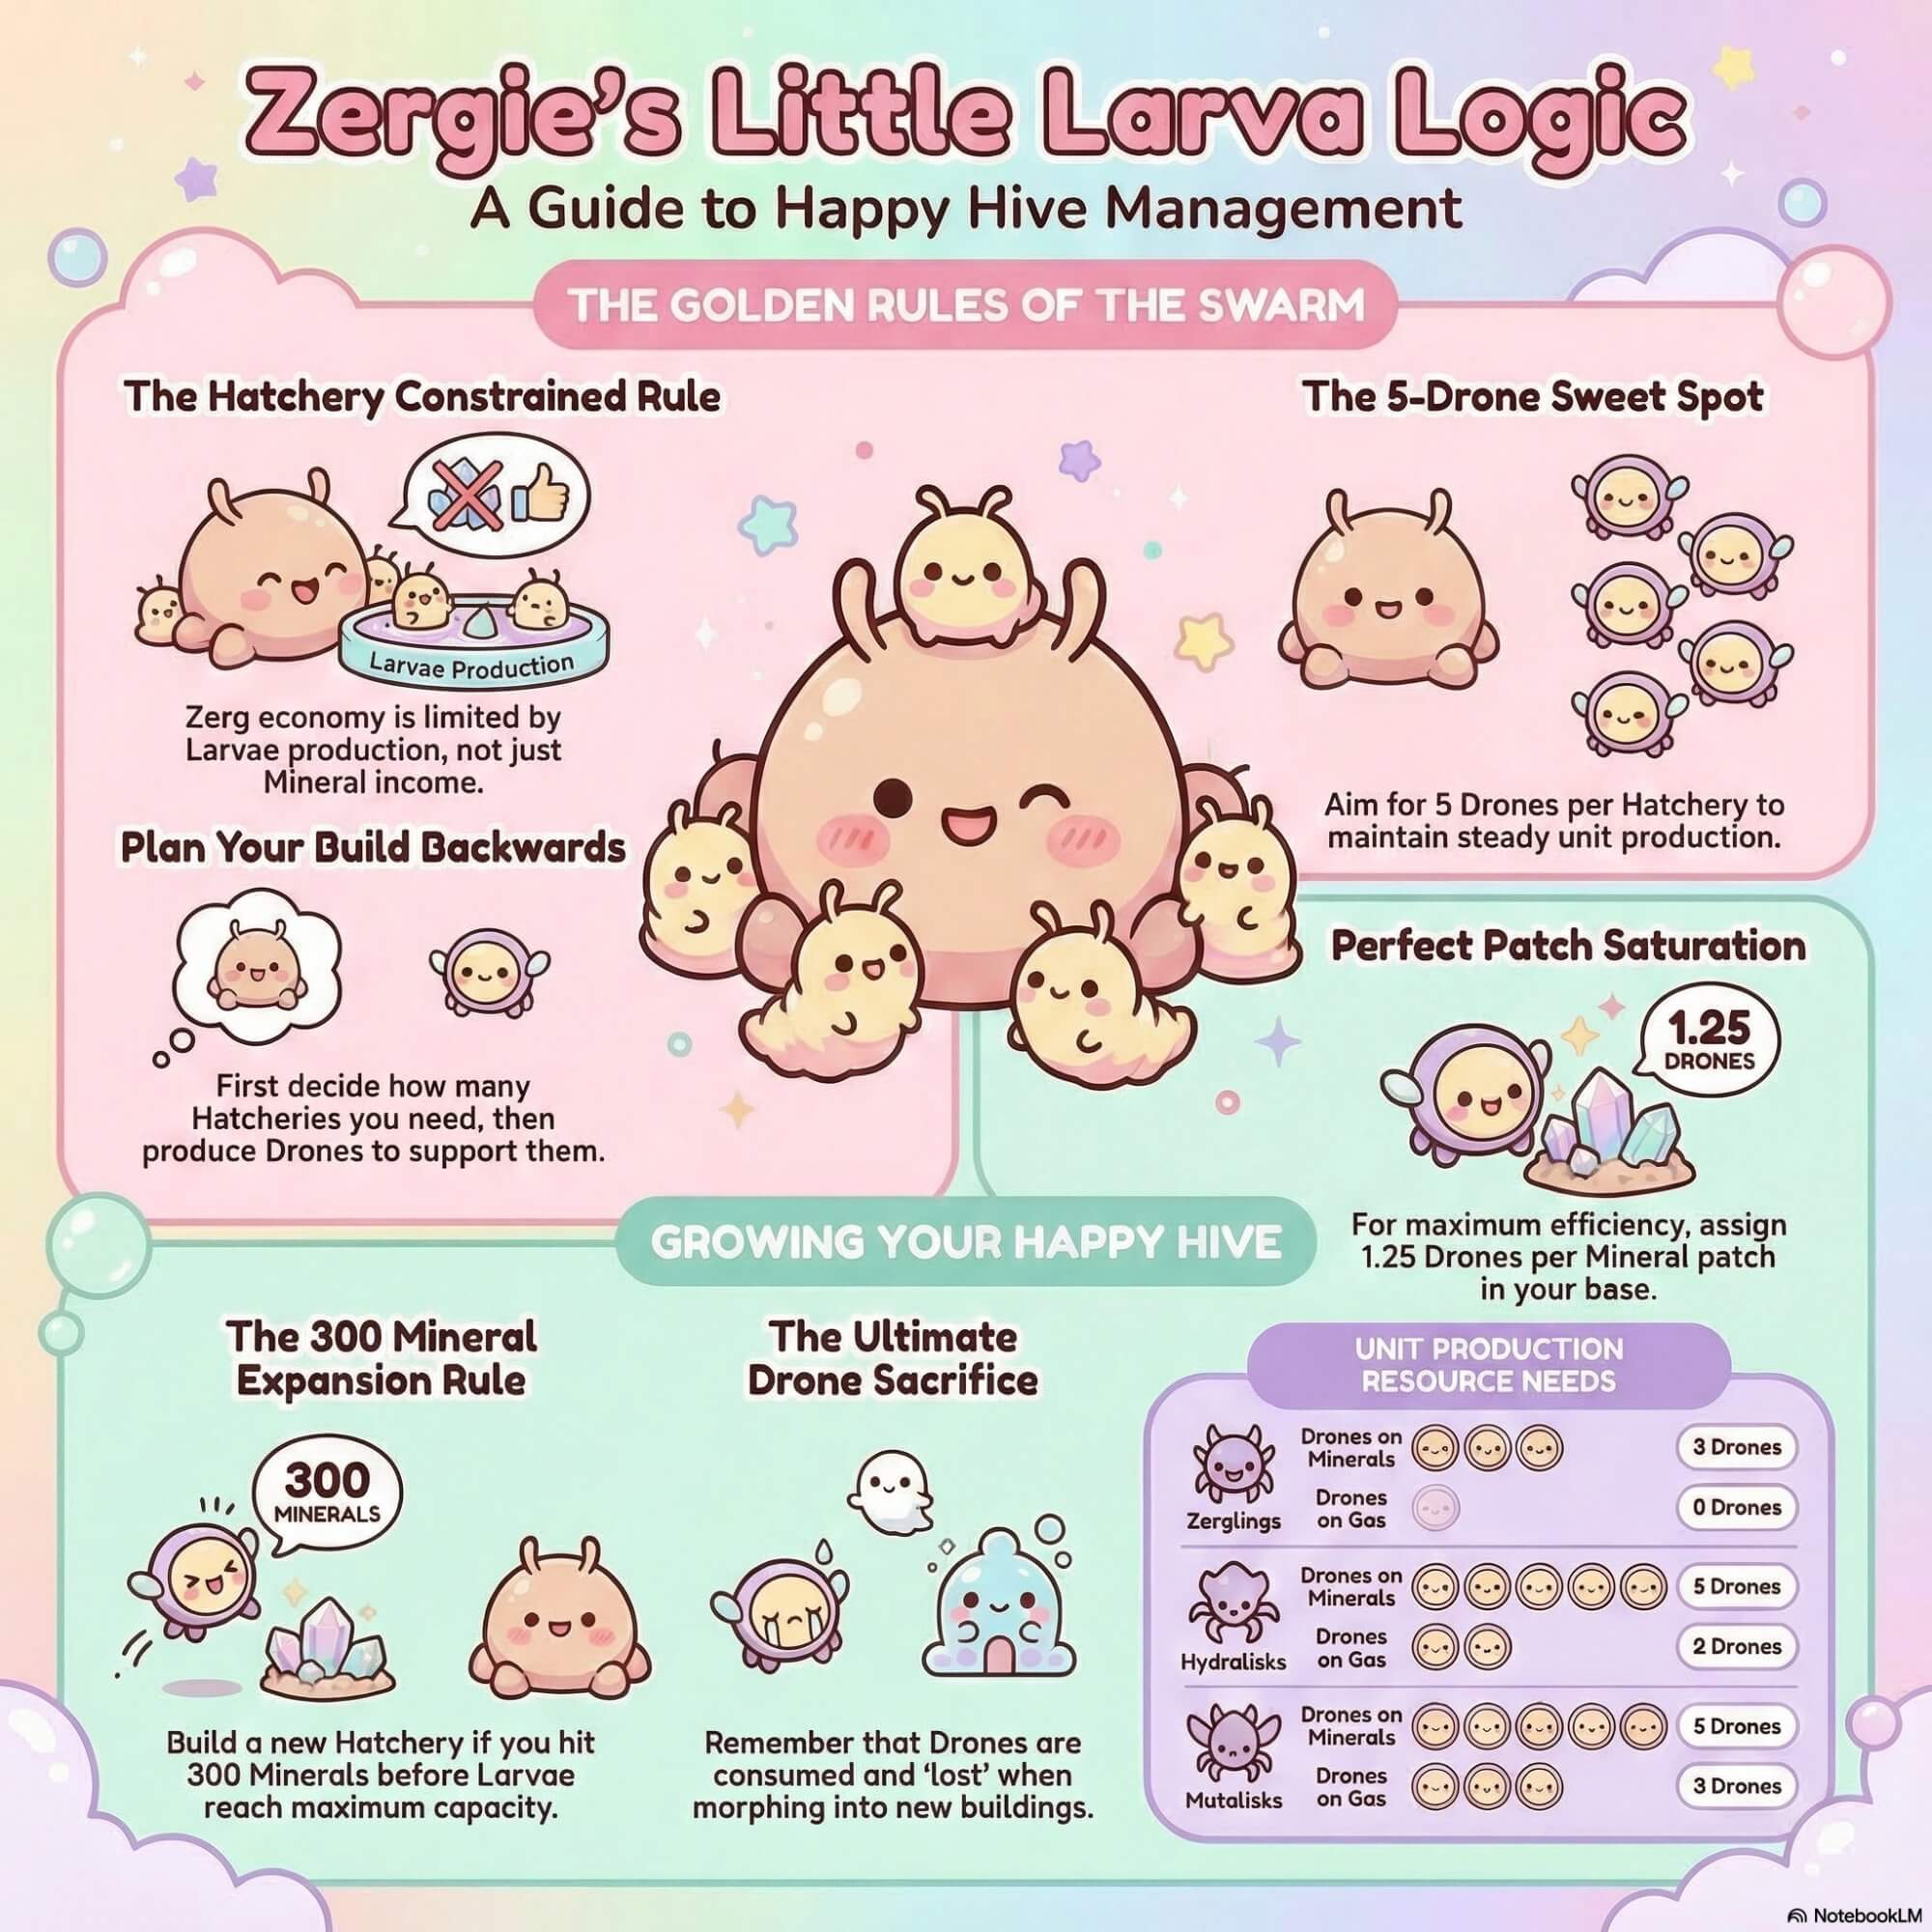
The Unique Genetics of Zerg Production
In the StarCraft architecture, the Zerg symbolize a biological hive mind that acts on a logic that is fundamentally different from Terran or Protoss. The other races produce workers and armies in parallel across multiple structures. For the Zerg, however, every tactical decision is an opportunity cost made manifested. Every unit — from the mining Drone to the apex Ultralisk — starts out as a Larva.
Because Larvae are a limited resource generated at a defined pace by your Hatcheries, the Zerg player is the only one who "punishes" themselves for raising an army. To create an army unit is to explicitly decide that a worker shall not be born.
The Larva is a currency unique to the Zerg. Production capacity is dependent on Hatchery counts and Larva timing — in contrast to other races who may simply build more production facilities to improve throughput. The Gosu player understands that the Larva is the ultimate bottleneck, and that managing it requires balancing the immediate demand for army with the long-term loss of economic potential.
This fundamental reality results in the "Swarm Rhythm" — a continual, fluctuating decision between Drones and combat units that defines every moment of a Zerg player's game.
Hatchery (max)
at 9-min mark
at 9 min (ZvP)
Mineral patch
The Great Dilemma: Drones vs. Combat Units
Every Zerg opening is a strategic manifesto. You are either powering your economy to achieve devastating mid-game saturation, or you are rushing to interrupt the opponent's plans before they can stabilize.
The Zerg Economic Seesaw — 3 Strategic Trade-offs
- Tech Speed: Greedier builds such as 12 Hatch or 4 Hatch before gas cause severe delays in gas timing. While you will have more Drones, your transition to Lair-tier tech will be delayed.
- Economic Health: Extreme aggression (4/5 Pool) halts worker production entirely. If the push does not inflict game-ending damage, the Zerg cannot recover.
- Pressure vs. Greed: Some aggressive builds — like the Economic 9 Pool Variation — are not designed to end the game, but to delay the opponent's expansion while allowing the Zerg to safely add Drones behind the pressure.
While the mechanics are simple, the mentality behind the choice determines the winner of the resource war.
The Passive Mindset: Scaling for the Late Game
The "Passive" playstyle is typical of Zerg players that seek victory through massive resource advantages. In standard builds like the 3 Base Spire, the objective is to pump Drones in order to stay competitive economically. The best players find the point of necessity — you drone until the very moment an army is required.
Three Indicators You Should Stay Passive
- Economic Symmetry: If a Protoss commits to a Forge Fast Expand (FFE), they are prioritizing their own economy — granting you the "permission" to prioritize yours.
- Infrastructure Cues: Watch the Gateway count. Only cease Droning and begin mass Hydra/Zergling production when the opponent begins producing out of 3–5 Gateways.
- Scouting Information: If your Overlords see the opponent remaining defensive inside their sim-city, you are free to continue "powering."
This passivity must remain flexible. Once the opponent moves out, you must transition instantly from worker production to the Swarm. The window is often just 30–45 seconds.
The Aggressive Mentality: Sacrifice for the Push
Taking the initiative and making the opposition respond is the goal of the "Aggressive" mindset. This is often an "all-in" move where the goal is to break the opponent's build before it develops.
In the specific context of ZvZ, the 9 Hatch build is a master class in this logic. It intentionally sacrifices mineral wealth for an early Larva count advantage. By having two Hatcheries early, you generate more Larvae than a 1-Hatch tech-heavy build — allowing you to overwhelm the opponent with sheer numbers of Speedlings.
The Sequence of an All-In
- Sacrifice Economy: Halt Overlord production at 9 supply to accelerate the Spawning Pool.
- Mass Larva Expenditure: Produce Zerglings from every available Larva the moment the Pool completes.
- Tactical Execution: Do not engage workers head-on if they are stacked. Use Zergling speed to pick off stray workers.
Success in these manoeuvres is measured by the "Build Check" — the objective metrics of your execution.
The "Build Check": Measuring Economic Health
To master the Swarm Rhythm, you must utilize internal benchmarks. At the 9-minute mark of a standard ZvP (3 Base Spire), evaluate your performance relative to the opponent.
| Metric | Target | Status |
|---|---|---|
| Drones on Minerals | At least 35 | ✓ Critical |
| Gas Workers | 6 Drones on 2 Extractors | ✓ Critical |
| Supply Total | 80–85 supply | ✓ Target |
| Protoss Benchmark | ~90–95 supply (Zealots + HT) | ↑ Their target |
| If below 80 supply | Early-game macro has "leaks" | ✗ Investigate |
If your supply is significantly lower than 80 at the 9-minute mark, your early-game macro has "leaks" — either idle Larvae or inefficient Drone management. Do not panic at lower supply than Protoss: hitting 80–85 means your production capacity will soon overwhelm them.
Tactical Defence: Knowing When to Build Sunkens
Resource management includes the "Drone Cost" of static defence. A Sunken Colony costs minerals, the creep colony morph, and the permanent loss of a worker. View Drones not just as a mining resource — they are a defensive health pool.
- Versus Probe Scouting: Use only 2 Zerglings. Do not interrupt the Swarm's growth.
- Versus Zealot Pressure: If a push is spotted, morph 6+ Zerglings — you need at least 3 Lings per Zealot.
- Drone Drilling (12 Hatch vs. 2 Gate): Do not over-rely on Sunkens. Fight with 3–4 Drones and your Zerglings until the Hatchery finishes. This preserves your Larvae for more Drones or units afterward.
Minimize static defence to maximize Larva utility. Every Sunken is a Drone that will never mine. Only build them when the alternative is losing your Hatchery.
Early-Game Unit Comparison
Understanding how Zerglings stack up against their early-game counterparts is key to making the right production decisions. Select a unit to compare its profile across five combat dimensions.
Mastering the Swarm Rhythm
Greed and survival are constantly at odds in the high-stakes game of Zerg. To protect your investment: drone until the opponent's threat reaches a critical level, expand and build Hatcheries to gain the advantage in Larva count, then explode into unit production.
Pro-Tip Summary
- The Larva is the Singular Currency: Never let a Hatchery sit at its Larva cap. Every wasted second is an army unit or Drone that will never exist.
- Respect the Opportunity Cost: Only build the exact number of units required to survive. If 6 Zerglings can hold a ramp, building 12 is a self-inflicted economic wound.
- Larva Advantage is the Win Condition: In ZvZ or ZvP, focus on having more "production points" (Hatcheries) than the opponent can handle.
- Relative Benchmarks: Do not panic if your supply is lower than a Protoss (80 vs 95). If you have hit your worker benchmarks, your production capacity will soon overwhelm them.